
It’s Back to School season and it’s time to get “regular” with our routines again!
Even if you don’t have to pack lunches for the littles anymore, there’s nothing like shifting with the seasons and getting back to a regular routine after a nice, lazy summer.
My partner Mark has fond memories from his childhood of his mother in the kitchen, cooking a family meal. He said because they had a large family, she was probably always in the kitchen, either planning and preparing a meal, cooking it, or dealing with the aftermath until the kids were old enough to help with the cleanup.
We had 3 kids in my family, but there was indeed a lot of time spent in the kitchen by my working mom–a lot!
If the Instant Pot existed back then it seems like moms in the 70s would have had it a lot easier. Sure, there were pressure cookers, but we were generally scared of them. We saw what happened when Lucy tried cooking with one after all…disaster!
When it came to convenience, we did have the crockpot (in lovely avocado green or harvest gold) but it was nothing compared to an Instant Pot!
It can truly change your life and your cooking experience, not to mention the simplicity of cooking with just one instrument, simplifying the cleanup process dramatically! However, there are certainly some things to be aware of to make your cooking most enjoyable, and here are my favorite Do’s and Don’ts for using an Instant Pot:
My Favorite Dos:
- Read the instructions! While it may seem obvious to some, this device has features and benefits that you can best understand and utilize if you actually read the instructions when you first take it out of the box. Guy’s, you are exempt from this step, of course, and please get out of the kitchen and stay away until you do read it. 😉
- Understand that Instant is not the same as instantaneous. “Instant” is in the name but this isn’t Star Trek and cooking will still take some time, so don’t be impatient and enjoy the true time savings once you are using it.
- Run a water test (boiling 1-2 cups of water under pressure) to make sure it is working properly and you are comfortable with the operation. If you are already cooking with it then you are already beyond this, so no worries.
- When following recipes and planning your meal, remember to add approximately 10 minutes to account for the initial warm-up and pressure sealing of the unit before the actual cooking time counts. Also, be aware of the extra time needed to depressurize the unit, often referred to as NPR (natural pressure release) or QR (quick release). A 10-minute recipe will not be ready in 10 minutes but will instead require at least 20-25 minutes to get it out of the pot.
- Use the “saute” button the same as you would use a skillet. When it comes to one-pot cooking, this will be a real blessing because the pot can be used in multiple ways, including the initial saute of your vegetables. I generally prefer ghee or avocado oil because of their high smoke points.
- Make sure when starting to cook that you place the pressure relief valve in the “sealing” position or the pressure will never build up and your food will not cook.
- Make sure the inner silicon sealing ring is in place. Without that seal, you will never build pressure in the pot to cook.
- Make sure you have liquid in the pot for every recipe. It is the steam from the heated water under pressure that cooks your food and without water, you are only baking a brick.
- Consider getting a 2nd silicon sealing ring. Some people are sensitive to the crossover of flavors if the ring is used on different foods and having different seals for specific types of food makes a difference. I don’t know how long a sealing ring lasts and I have used mine extensively, but if it ever fails then you will have to wait for Amazon to deliver a replacement if you cannot find one at your local store.
- Learn how to adjust the temperature, pressure, and cooking times. Rice is a perfect example of how a food that seems to all be the same is really quite different. As a food staple for many, the mixture is generally 1:1 for rice and water, but Jasmine rice will cook in about 3 minutes, Basmati rice will take 6 or more, and brown rice can take 15 minutes. BTW, for softer rice instead of al dente, add a little more water, up to ¼ cup.
My Favorite Don’ts:
- Don’t use it without reading the operating instructions! Sound familiar? 😉
- Don’t ever cook without adding liquid, at least ½ – 1 cup of water or other liquid.
- Don’t add dairy to the pressure cooking. Add your milk or cream after the pressure cooking is completed or it will likely curdle and ruin your soup.
- Don’t add cold dairy to your hot liquid. When you do add your dairy (milk or cream); make sure it is warmed up first. If you add cold milk to a hot liquid it can also curdle or separate and ruin your recipe.
- Don’t add any thickeners (corn starch, flour, arrowroot, potato starch) to your recipe until the pressure cooking stage is done.
- Don’t use the quick release (QR) option when cooking soups or other dishes that can have foam on top. If you do release pressure quickly there will likely be spitting and spraying all over your kitchen, so let it drop pressure naturally, or carry the pot outside first and stand upwind.
- Don’t use the quick-release (QR) when cooking most meat as it will reduce the moisture content and tenderness that results from a slow pressure release.
- Don’t ever cook without using the inner pot. (I know, this seems obvious, but there are stories out there.)
- Don’t use the “timer” button for cooking time; it is used for delayed cooking time, not actual cooking time.
- Don’t place a towel over the pressure release valve when doing a quick release (QR) as it can mess up the controls and proper operation of the pot.
- Don’t put your hand in the steam as it is released as it can cause severe burns. Perhaps this is also obvious, but some cannot resist the urge to test it, especially children when they are around.
- Don’t place your pot under your kitchen cabinets because the release of steam will likely damage them.
- Don’t place your pot on a stove because a burner could be accidentally turned on and will melt your unit.
- Don’t ever try to open your pot if it is still under pressure. Although there are safeguards built in to the unit, if you were to try and open the pot while there is still pressure built up you can have an eruption all over your kitchen, and possible injuries.
- Don’t store your Instant Pot with the cover on. Instead, remove the silicon ring or store it with the cover upside down so that the silicone ring doesn’t get “fatigued” over time and maintains its spongy properties for a good seal when cooking. It is sort of like storing a classic car in the garage when you put it up on blocks instead of sitting on the ground and flattening the tires. (OK guys, you can come back in the kitchen now that we are discussing classic car storage.)
Now how about a recipe? 🙂
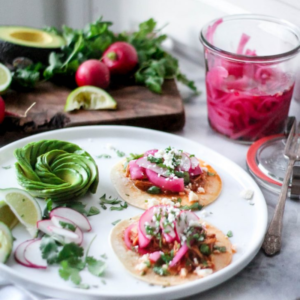
Instant Pot Spiced Shredded Chicken Tacos and Quick Pickled Onions
Ingredients
- 1 large red onion halved and sliced
- 3/4 cup apple cider OR white wine vinegar
- 1/2 teaspoon sea salt
- 1 teaspoon honey
- 2 cloves garlic quartered
- 1/2 teaspoon whole black peppercorns optional
- 1 jar salsa red or verde or chipotle - your choice!
- 2 pounds skinless boneless chicken breasts OR thighs
- 1 medium yellow onion halved and sliced
- 2 teaspoons sea salt
- 1 teaspoon cumin
- 1 teaspoon dried oregano
- 1 teaspoon chili powder
- 1/2 teaspoon cayenne pepper
- 1/2 teaspoon ground coriander
- 8 to 12 corn tortillas
- chopped cilantro optional topping
- sliced radish optional topping
- queso fresco optional topping
- 1 large avocado optional topping
Instructions
- Place sliced red onion in a strainer and boil a kettle of water.
- In the jar you're using to store the pickled onion, place vinegar, salt, honey, garlic, and peppercorns. Stir until salt and honey are dissolved.
- Once water boils, slowly pour water over the sliced onion. Blanching them so their slightly tender.
- Give the strainer a little shake to help get rid of excessive water, then add onion to the jar with vinegar mixture. Press into jar until onion is fully submerged. Seal and place in refrigerator for AT LEAST 2 hours before using.
- In an Instant Pot, pour half the jar of salsa and make sure bottom is evenly coated.
- Place chicken on top of salsa, then onion on top of chicken.
- In a small bowl, combine spices (salt through coriander). Season onion and chicken evenly, then top with remaining salsa.
- Seal Instant Pot, then select "Meat/Stew" setting and cook for 90 minutes. Once it's done, let rest for 5 minutes, then release the vent for the steam.
- After the steam settles, remove lid and, using two forks, shred the chicken!
- Serve on tortillas with pickled onions and other toppings! You'll find some of our topping favorites listed above but we encourage you to add whatever your favorite toppings are!
- DIG IN!!!
Notes
Want more recipes like this one? Get our One Pot Recipe Collection, available in Classic, Paleo, or Low-Carb. This collection includes 100 one-pot recipes to make dinner a breeze! Click here for more information.